Estimated reading time: 14 minutes
Imagine spending hours packing up your stuff for a move or courier delivery, and you begin to close your boxes only to find out you’re out of tape. Gasp! Fear not; today, we will focus on some ingenious techniques for closing a box securely – no tape required.
Let’s face it! Life is full of surprises, and we don’t always have everything we need at hand. So, what to do when no tape seals up a box? Stay aware of this predicament; we’re here to show you how to think – and seal – outside the box!
Table of contents
1. Interlocking Flap Technique
The easiest – and most intuitive – method to try when in a tapeless situation is the Interlocking Flap Technique. You might remember this technique being used on board games or shoe boxes.
Before diving into the process, let’s briefly cover the Interlocking Flap Technique. This method involves layering the flaps of the box in such a way that the tension between them creates a natural seal. No adhesive is required!
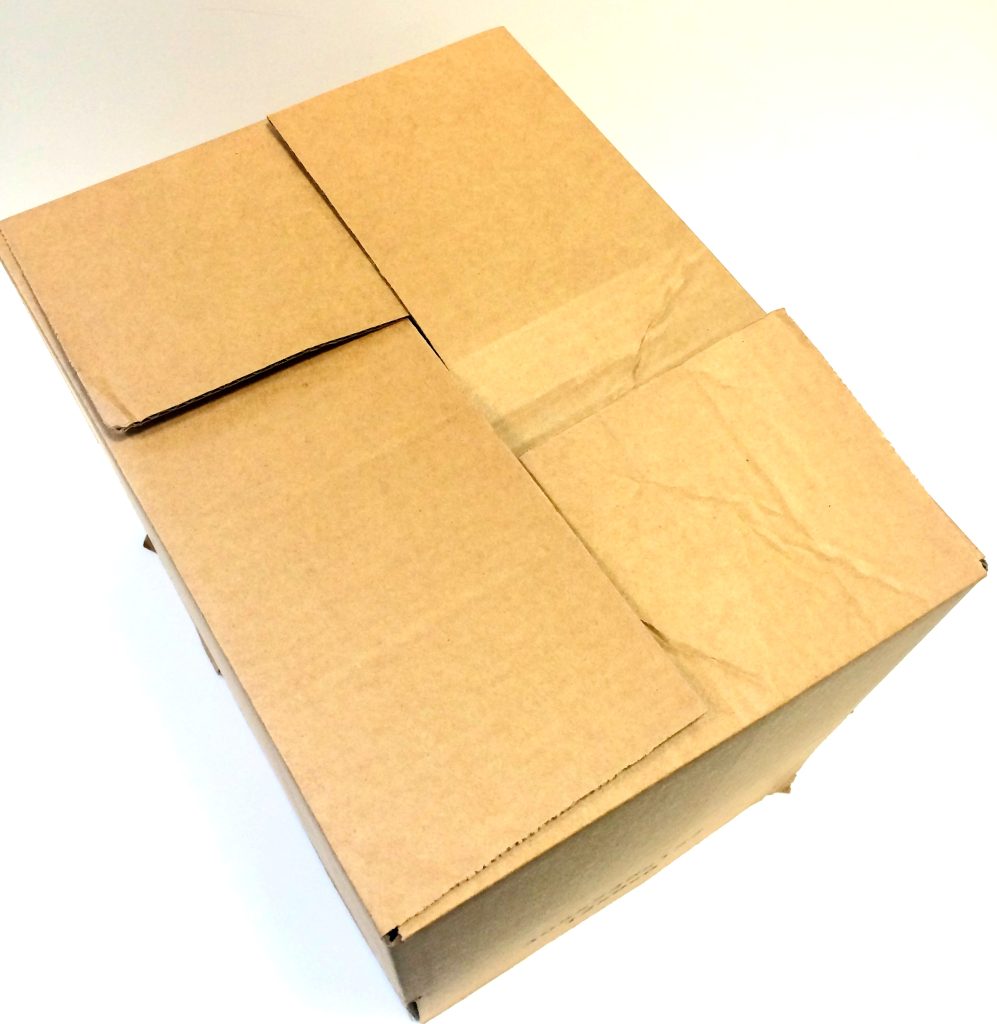
Firstly, position the box so the flaps on top are arranged in a cross shape. Now, let’s get down to the nitty-gritty. Here’s the process, step by step:
- Fold down one of the smaller flaps
- Fold one of the larger flaps over it
- Fold the other smaller flap over the folded larger flap
- Take the last larger flap and tuck it under the first smaller flap
You should now have a box that is securely closed without any tape!
The Interlocking Flap Technique is simple and convenient, and you can also easily unbox the contents without any risk of damaging the box or needing box cutters or scissors. It’s a perfect all-rounder for any tapeless situation you find yourself in.
2. Using Hot Melt Glue
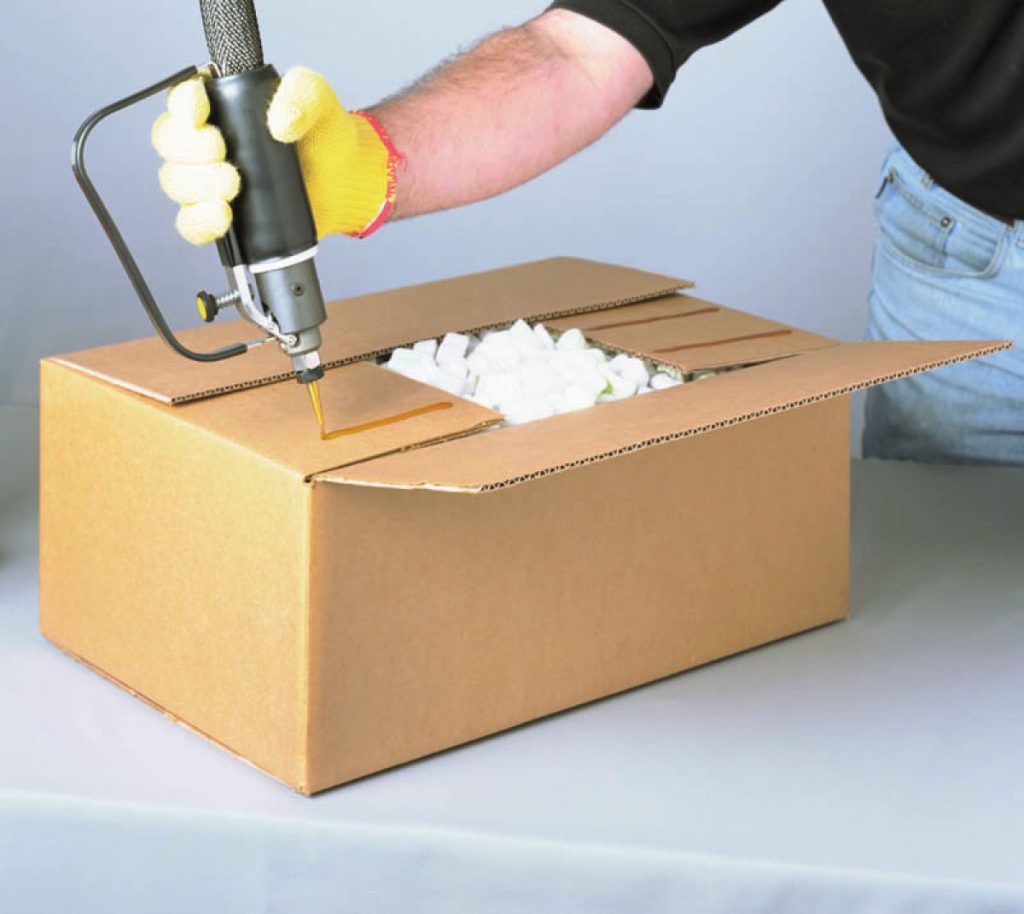
Hot melt glue is another alternative to tape that you may find useful, especially when dealing with more robust types of cardboard boxes. Generally used in arts and crafts, this substance forms a strong bond with the material and creates a long-lasting seal.
Procedures to Use Hot Melt Glue for Box Closure
Before we proceed, it’s important to note that hot melt glue requires a glue gun. This tool is relatively affordable and readily available in craft stores, online e-commerce websites, or even in some supermarkets. If none is available, you can attempt to borrow one from a friendly neighbor who loves DIY projects or similar crafts activities, and you’ll be all set.
Here’s how to use hot melt glue for box closure:
- Plug in your glue gun and give it some time to heat the glue stick inside. This usually takes a couple of minutes.
- While the glue gun is heating, fold your box and hold the flaps in place. This task may require an extra set of hands, so try to get a buddy to assist if you can!
- Once the glue gun is hot, quickly apply the glue along the inner edges of the box flaps. Draw a glue line along the flaps’ side and press them to the box.
- After you’ve applied the glue, keep the flaps held down for a few seconds to allow the glue to cool and achieve a firm bond.
Safety Precautions
As a handy and universally accessible alternative to tape, hot melt glue can be an essential tool for your box-closure needs. Keep reading to discover more techniques without the use of tape!
3. Using Staples
A third method to consider when you’re tapeless and need to close a box securely is using staples. This may seem unconventional, but staples can be quite effective in certain circumstances. Staples, like tape but clipped instead of stuck, hold the box’s flaps together, preventing your items from making a surprise exit. Before applying this method, there are important factors you need to remember.

Staple Dimensions for Effective Box Closure
Staples come in a variety of sizes, gauges, and other characteristics. For instance, the thickness of staples can range from 23 to 10 gauge, with lower gauges being thicker and thus stronger and more durable.
The most commonly used staple size for box closure is a 1/2 inch (12 mm) staple. This size should be sufficient to penetrate through the cardboard and effectively hold the flaps together without causing significant damage to the box.
The strength of the cardboard also needs to be considered. Thinner cardboard may tear if the staples are too large. In contrast, thicker, sturdier cardboard may require larger, more robust staples to ensure an effective closure.
How to use it
Applying staples is quite simple. Hold the box flaps together, position the staple gun, and push down the handle. Do this several times on several spots on the box’s parallel flaps to ensure the box remains closed.
Although staples can leave tiny holes, they’re less likely to damage the box’s interior, given the piercing’s small size. And as with all methods, you’ll want to consider the nature of what you are packing before you start stapling away.
4. Utilizing a Box Latch
The box latch is another effective option to secure your box without using tape. But you might be asking, what on earth are box latches?
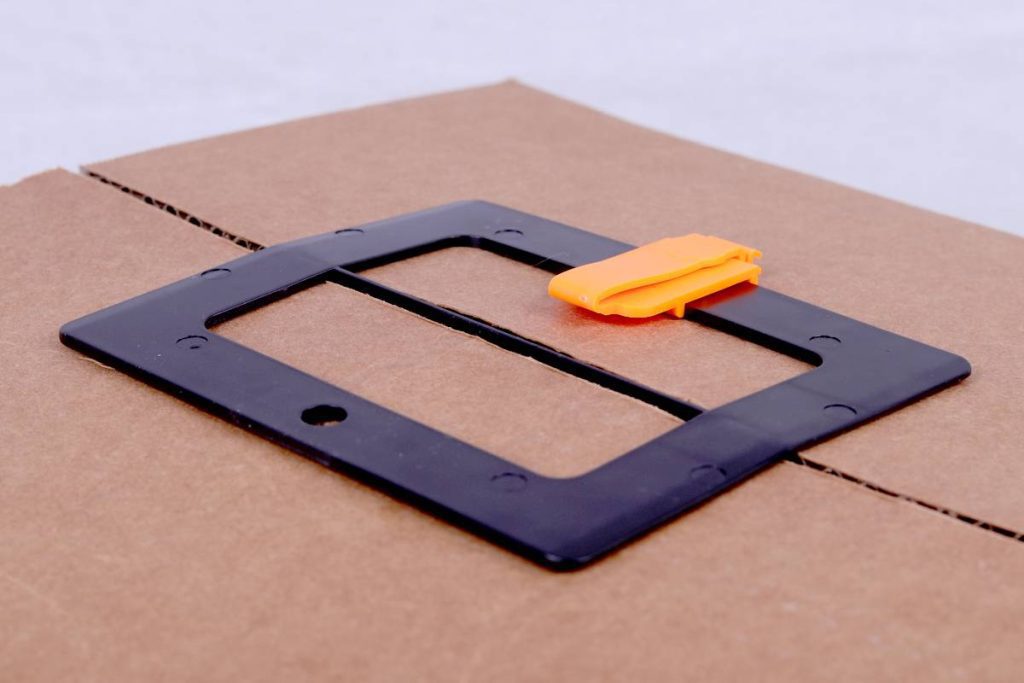
Well, they are fantastic tools that securely latch your box and hold the box flaps together tightly. The awesome thing about them is that they’re reusable. You don’t have to worry about purchasing a new latch every time you want to box something up – unlike tape!
One size does not fit all, and similarly, box latches come in multiple sizes so that you can secure boxes of varying dimensions. Another stellar feature of these latches is that they let you open the box without destroying it. It means that your box can be reused time and again without any damage.
However, every cloud has a silver lining, and with box latches, you need to bear a couple of things in mind. Firstly, they come at a steep price. Buying a pack of 10 box latches can set you back anywhere from $40 to $60. So, these babies aren’t the cheapest option out there. Secondly, they are solely designed to close a box, excluding the bottom part of it. That means they can’t secure the bottom of your box like tape can.
5. Self-Locking Cardboard Boxes
In our quest to discover ways to securely pack a box without tape, another possible favorite could be self-locking cardboard boxes. But what exactly are they, and why are they such an effective solution? Let’s take a closer look.
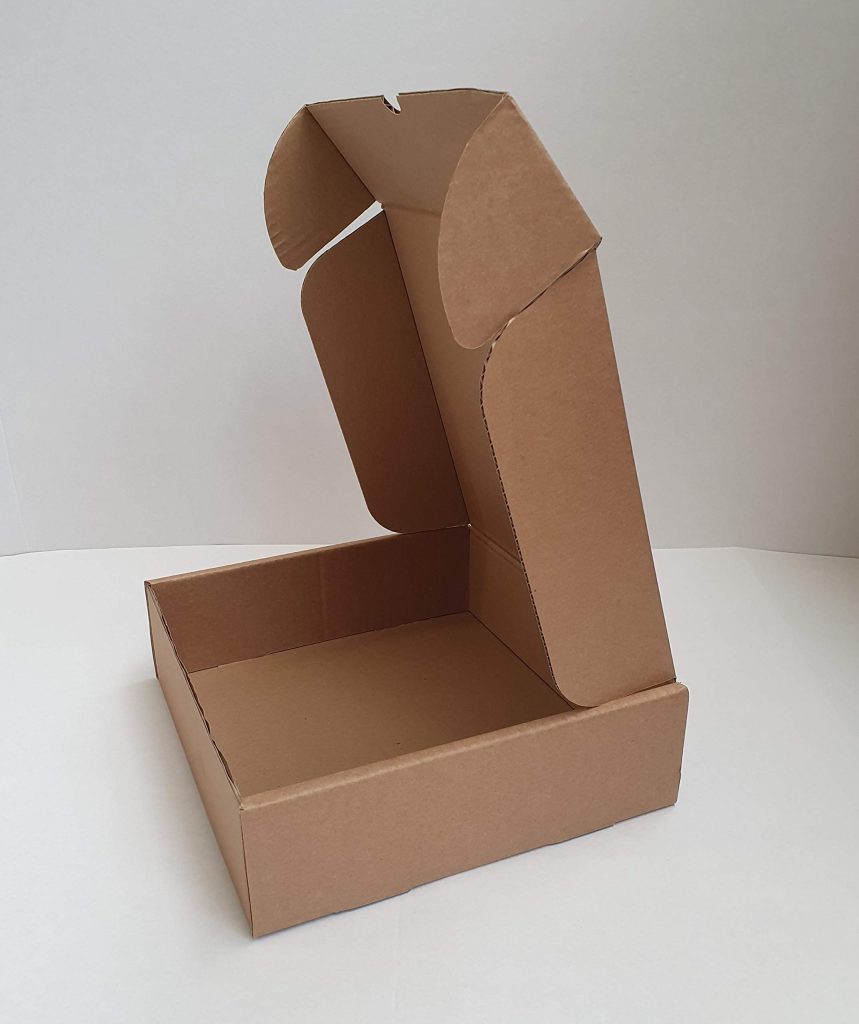
Self-locking cardboard boxes have a unique design feature that allows them to close securely without employing any external tool, such as tape or glue. These boxes come with pre-cut flaps or tabs which, when folded correctly, interlock with each other, hence the term “self-locking.”
Advantages
Now, let’s talk about the advantages these boxes punch way above their weight. First things first, they’re super user-friendly. Since the flaps or tabs are designed to interlock smoothly, you don’t need to be a packing expert to figure out how to close them.
They do not require tape, staples, or glue to stay shut, so you are less reliant on external resources, which could be in short supply, especially when you’re packing up in a hurry. Quick to assemble easy to close, a self-locking box can be a real game changer for impromptu packing scenarios!
Self-locking boxes are also a darling for those who are environmentally conscious. Since they reduce the need for adhesive tape, a product made of non-renewable resources, using them is a small step towards reducing the consumption of such materials and helps friendlier to the environment.
Disadvantages
While they are practical and eco-friendly, it’s worth noting that they may not be suitable for very heavy items, as the lack of tape may compromise the box’s integrity under high-weight conditions. But a self-locking cardboard box can be the savior you never knew you needed for moderate to lightweight packing needs!
6. Using Strings
Ah, now, who’d have thought we’d end up here? Strings – the humble hero that often doesn’t get the recognition it deserves. It’s more than just a favorite plaything for cats or the thing you find yourself untangling after every holiday season. Strings can be an effective and resourceful way to close a box without using any tape. So, let’s learn more about how to use string to close a box securely.

First, ensure you have enough string. The last thing you want is to run short part-way through. A rough guide to figuring out how much you might need is this simple approach: double the height, width, and length of your box, then add these three numbers together. That should give you enough to work with, plus a bit of spare string, just in case.
Once you have your string, place your box on a steady surface and make sure you have secured the items inside. Now, wrap the string around the box’s width, crossing over the top, making a ‘T’ shape. Hold these ends and run the string around the length, again creating the cross part of a ‘T’. You should now have a ‘T’ on the top and bottom of the box.
Pull the string tight, but be mindful not to strain the box. If it’s a less sturdy box, pulling the string too tight can cause the box to collapse, or worse, the string could tear through the cardboard. Remember, the goal here is to secure the box, not test the box’s structural strength.
Next, you tie the string together. You can use a simple knot, a square knot, or a bow, depending on the type and thickness of the string – a bit like tying a necktie, only a little more significant. The top should look something like a beautifully wrapped gift box, reminding you of the holiday season.
And voilà! You have just sealed your box using a string! The old-school yet reliable way, as long as you’ve tied it correctly, your box should be good to go. You might not have considered using a string to close a box before, but it can be a lifesaver.
7. Furoshiki Wrapping
Let’s take a brief virtual trip to Japan, a country renowned for its rich culture, innovative technology, and creative solutions to everyday challenges. One of these ingenious solutions is Furoshiki wrapping, a traditional Japanese technique using cloth to secure objects ranging from bottles to boxes.
But what exactly is Furoshiki, you might ask?
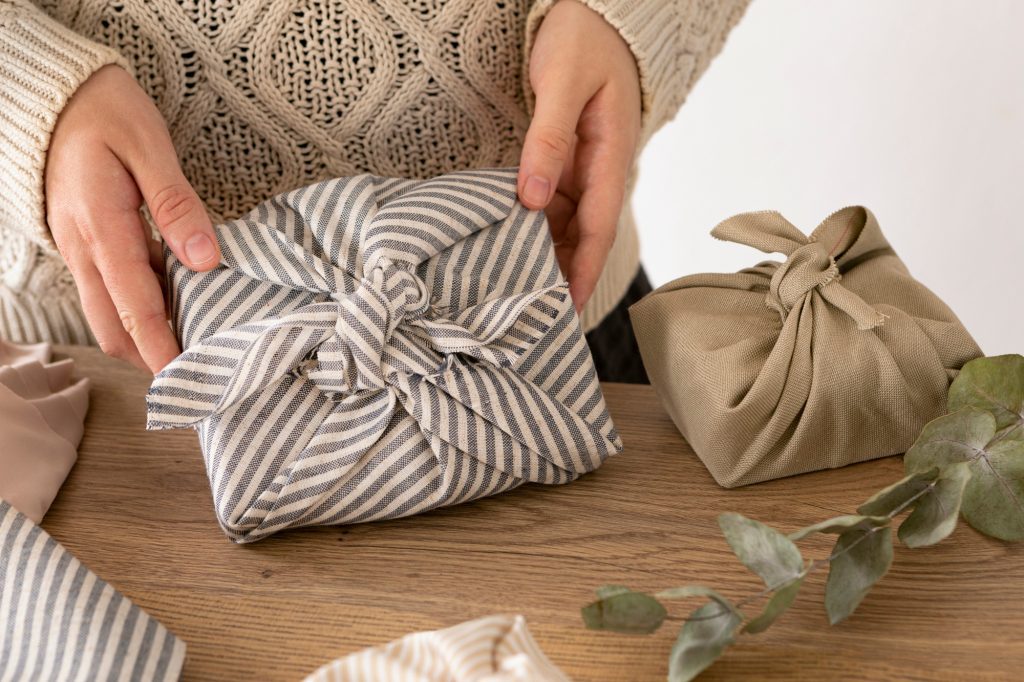
At its core, Furoshiki is a square piece of cloth. In Japanese, “Furo” means bath, and “Shiki” means to spread, and many centuries ago, this cloth was used to carry clothes to public baths. Over time, it became a multi-purpose, eco-friendly wrapping technique to carry and store many items, including our subject of interest, boxes!
How to do it
Firstly, you need to lay the Furoshiki cloth flat on the table or any flat surface. Position your box at the center of the cloth. If the box is square, place it in a way that its corners align with the middle of the cloth’s sides. If you’re working with a rectangular box, align it with the cloth’s corners.
Next, grab two opposing corners of the cloth and tie them above the box in a simple, tight knot. Do the same with the remaining two cloth corners, tying them on top of the first knot. Ensure the cloth tightly wraps the box with no loose ends, giving your package a neat, elegant, and secure look.
For an extra secure knot, you can make a double-knot, and to finish, you can either tuck in the leftover pieces of cloth near the knot or let them stick out, giving the package a more decorative look.
The beauty of Furoshiki wrapping lies in its simplicity, aesthetic appeal, and the fact that it leaves no waste behind. It’s also efficiently resilient–the knot will stay secure until intentionally untied.
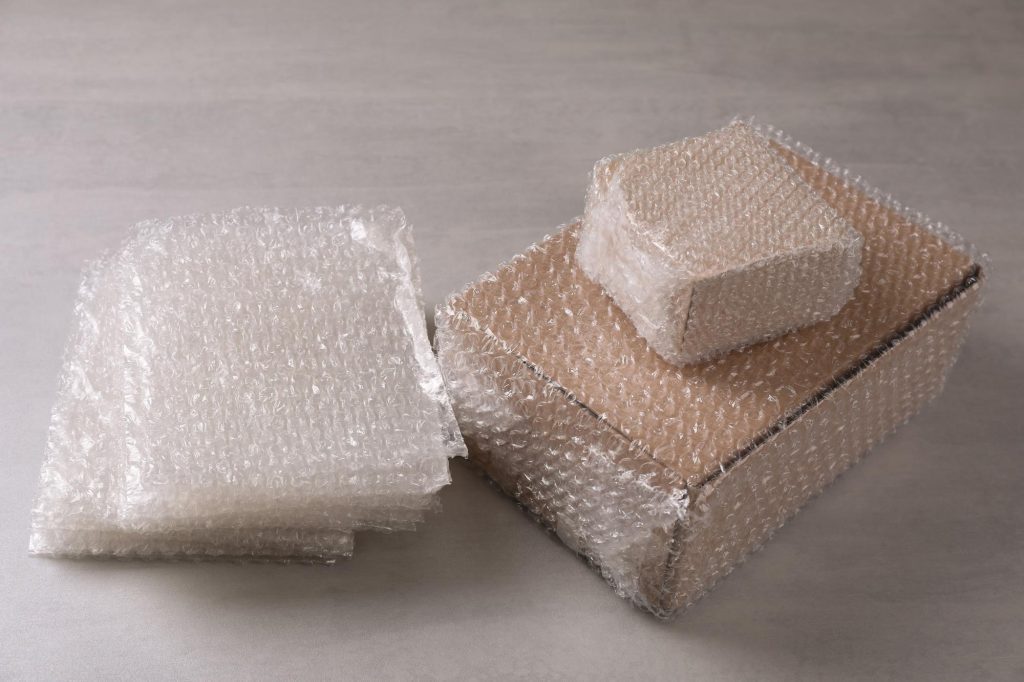
8. Bubble Wrapping
Bubble wrap allows you to seal your box. It provides extra padding and protection, ensuring your item remains safe, regardless of what shakes or bumps might come its way.
So, how do we go about it? Let’s discuss it!
- Sizing the Bubble Wrap: First, you’ll need to figure out how much bubble wrap you require. Lay your closed box on the bubble wrap roll and unroll enough to cover the box’s top, sides, and about 3-4 inches over its edges. This overlap lets you tuck the wrap securely under your box, holding the flaps down.
- Position the Box: Position your already-closed box—with the flaps tucked neatly in, of course—on the bubble wrap. Make sure it’s centered and ready to be enveloped in its protective layer.
- Wrapping the Box: Start bringing the bubble wrap up and over the box’s sides. Imagine you’re wrapping a burrito or a present, and you’ll get the idea. You’ll be left with the ends of the wrap, which you should tightly tuck under the box, creating a kind of bubble wrap “belt”.
- Secure the Bubble Wrap: You can knot the bubble wrap ends together or, for more security, use a small piece of string or a rubber band to tie the bubble wrap ends tightly. If the bubble wrap keeps slipping, consider using labels, stickers, or even a hot glue gun (with caution!) to keep the wrap in place.
Although bubble wrap can keep your box safe, it’s not a perfect solution for closing a box without tape. In the end, again, you’ll have to fasten the wrap somehow!
Remember, the best method often depends on what you are packing, the resources you have on hand, and where the package will be going. Feel free to mix and match these techniques, and happy packing!
Extra Tips and Suggestions
To ensure that your box is not only closeable but also stable and secure, pay attention to how you arrange the contents. Ideally, all items should be snug but not squeezed too tight, and the mass should be distributed evenly. This doesn’t mean everything has to be perfectly symmetrical, but rather that you’re keeping careful balance–nothing too heavy should be on top. The box should not tip to one side when lifted. Good packing also protects your items from damage. It’s like solving a real-life, 3D jigsaw puzzle – a bit tricky but incredibly satisfying once done right!
Securing Items Inside the Box
Now, you’ve packed your box precisely, but how do you make sure the items inside stay put? Here are some great tactics:
1. Fill Empty Spaces: Use crumpled paper, bubble wrap, or other soft, flexible materials to fill all empty spaces. This extra stuffing can prevent your items from shaking around, lowering the risk of damage.
2. Larger Items on Bottom: As mentioned earlier, balance is key. Generally, the heaviest items should go on the bottom, with lighter objects on top. It helps with weight distribution and prevents more delicate items from being crushed.
3. Wrap Breakables: Any valuables that could break should be wrapped individually. You can use anything from bubble wrap to old newspapers. The goal is to provide an extra layer of protection.
4. Keep It Tight: If your items continue moving around, use bungee cords or rubber bands to secure them together. They could be particularly useful for awkwardly shaped items or packing many things in one box.
FAQ
We’ve discussed quite a few techniques to close boxes without the use of tape, and you may have some questions. Let’s take a look at some commonly asked questions and their answers.
Yes, it’s safe if used properly. Always handle hot melt glue carefully and avoid direct skin contact to prevent burns. Make sure to work in a well-ventilated area and keep it out of reach from children.
A strong nylon or hemp string is ideal. It ensures a firm, secure binding.
Not at all. The design of these boxes allows for secure locking without any additional tools.
They are readily available on online retail stores like Amazon or at a local packing supplies store.
It is quite effective for lightweight packages. However, it’s better to consider additional methods like knotting with a string or using a latch or glue for heavy or fragile items.


